How to Make Homemade Finger Paints

finger-paints-homemade

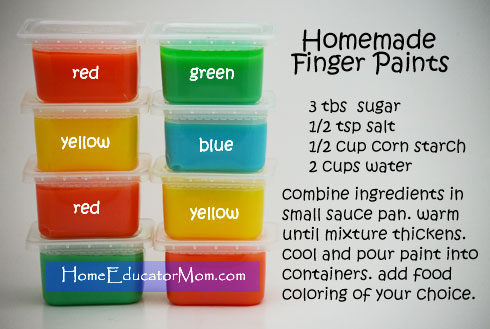
I came across this recipe on how to make finger paints that is food based and safe for kids. As many of the store-bought paints are lead based and are not safe for kids in the long run, I choose to make my own finger paints. This homemade finger paint recipe is very simple and inexpensive. Refer to the picture above for the recipe.

My thoughts: You might find your paint thickens a bit more over time. Simply add a little water to thin (or add corn starch to thicken). Paint containers are baby food jars. I hope your kids will enjoy some finger paint fun with these colorful homemade paints!

Paint keeps for about one week.

I first saw this recipe on The Honorable Mention Preschool Blog. You can also find it at Easie Peasie homemade finger paints.

Edible Snowflakes

In keeping with the season and continuing on our reading of Snip, Snip… Snow! and other snow books, I decided to do an edible snowflake activity with the kids. They had a fun time and the best part was eating it.  Here’s how:

Ingredients:

Flour tortillas, any vegetable oil (I used grapeseed oil), powdered sugar, parchment paper.

Instructions:

Preheat the oven to 400 degrees. Microwave the tortillas for about 10-15 seconds until they are soft and warm. Fold each tortilla as if you were folding paper or coffee filter to make a snowflake. Read this post Snip, Snip… Snow! on how to cut snowflake instructions. Use kitchen scissors to cut shapes…just like you were using paper. Unfold the tortilla. Lay parchment paper on cookie sheet and brush oil on both sides of snowflake. Bake the snowflake on the cookie sheet for about 5 minutes or until it’s lightly browned and crisp. Remove from oven and sprinkle with powdered sugar or any other edible toppings you would like. Now, enjoy this yummy treat!

Note: In my quest for healthier options, I tried using whole wheat tortillas, but sadly they tasted like chewy cardboard, so you’re better off sticking with your white flour tortillas.

For instructions on making colorful snowflakes, read this post Colorful Snowflakes.

Recipe adapted from MamaJenn.


Christmas Craft for Kids: Beaded Candy Cane

One Christmas ornament that we enjoy making is candy canes. I first learned of this simple beaded candy cane from my friend Margaret when we were doing a winter Vacation Bible School (VBS) together. And since then, I’ve adapted this activity with my kids. Here is the story of the candy cane with its rich symbolisms to remind us of the true meaning of Christmas.


Look at the Candy Cane

What do you see?

Stripes that are red

Like the blood shed for me

White is for my Savior

Who’s sinless and pure!

“J” is for Jesus, My Lord, that’s for sure!

Turn it around

And a staff you will see

Jesus my shepherd

Was born for Me!

Materials:

Red Chenille Stem (or pipe cleaners)
Beads (Red and white)
Strings for hanging

Instructions:

1. Cut pipe cleaner into half.
2. String alternating red and white beads onto pipe cleaner or use RRW (red red white) pattern
3. Bend beaded pipe cleaner into candy cane.
4. Tie string onto candy cane for hanging.

As an extension, your kids might like these children’s books:

J is for Jesus, The Sweetest Story Ever Told by Crystal Bowman

The Legend of the Candy Cane by Lori Walburg
(We’ve read the older edition)

I got the candy cane poem from Ministry to Children.

Thankful Basket

As we enter into this season of thanks, I wanted to create a home environment where my kiddos can express their thanks to God for His blessings. At the beginning of the month, we started our Thanksgiving tree. Now we wanted to share with you our thankful basket. This simple activity not only helps all us to recount our blessings, but is also a language arts lesson. This is how our thankful basket works.

Materials:

Basket or another container
paper
pen or pencil

Instructions:

Set a basket, precut papers and pencil on a table.  Anyone in the family can write and drop their thankful messages into the basket. On Thanksgiving day, we’ll pass around the basket and read some or all of the messages.

Note:

Since Buddy’s learning to write, I encouraged him to write as much as he wanted for himself and help his siblings. He did so eagerly. He’s learning without even knowing it!

The day before Thanksgiving, we passed the basket around after dinner and we read all the messages in the basket. Here’s Buddy reading one of them.

Do you have a favorite Thanksgiving activity that you would like to share. Please drop a note in the comments sections.

Adapted from Shirley Dobson’s books Let’s Make a Memory.

ThanksgivingTree


To start off the Thanksgiving Holiday, I decided to do a craft with the kids that will allow them to have a hands-on experience.  The idea of this craft is to get them to write down one thing that they’re thankful for each day.  Through this exercise, I am hoping that they are mindful of the many blessings that God has given to us as a family.  So, here’s the Thanksgiving Tree that’s in our kitchen.  Enjoy!

Materials:

2-3 yd. brown butcher paper (I think mine was 24″ wide, got it at a local educational store)
Fall leaves
Painter’s tape (doesn’t ruin your wall)
Marker for writing
Strips of paper (optional)

Instructions:

1. Lay out brown butcher on floor.
2. Sketch out a tree on butcher paper with black marker and cut it out.
3. Tape tree to a wall with marked side facing into the wall, and start decorating your tree with some fallen leaves.
4. Everyday, have each family member write down what they’re thankful for on a leaf and simply tape leaf onto tree using painter’s tape.

 Here’s our leaves after our first day.

Our Thanksgiving tree after day 1. Pretty soon, it’ll be filled with beautiful leaves with all our blessings.

Note: I bought these foam leaves from Michaels, and decided I’ll reuse them in the years to come, so I cut strips of paper for writing instead of writing directly on the leaves themselves. Remember Michaels and Joann both take each other’s coupons. There’s a lot of 40 or 50% off coupons out there at this time of year.

Does your family have a neat way of celebrating this season of thanks? I’d love to hear from you. Please share some of your traditions.